20+ Years Experience
Specialist Factory Flooring
Enquire Today For A Free No Obligation Quote
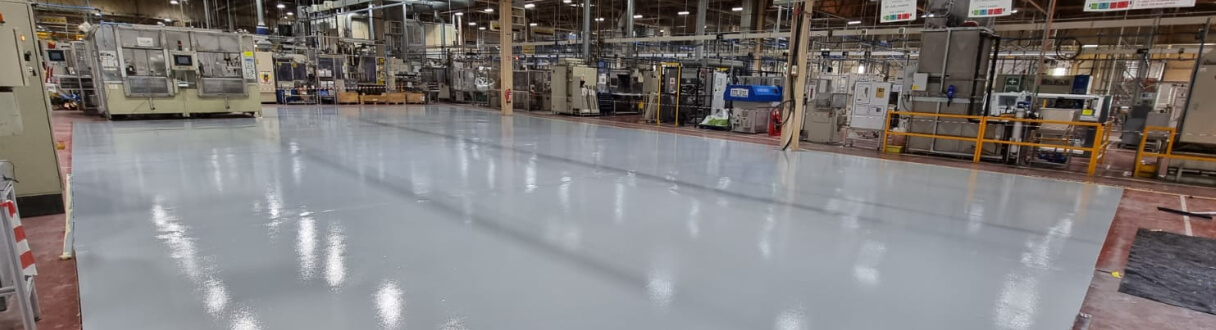
Creating a Modern Look with Polyurethane Resin Flooring
Understanding the Benefits of Polyurethane Resin Flooring
Polyurethane resin flooring offers numerous benefits that make it a popular choice for modern interiors. These benefits include:
Preparing the Substrate for Polyurethane Resin Flooring
Before installing polyurethane resin flooring, proper substrate preparation is essential. This includes the following steps:
Installing Polyurethane Resin Flooring
The installation process for polyurethane resin flooring involves the following steps:
Maintaining and Extending the Lifespan of Polyurethane Resin Flooring
To keep polyurethane resin flooring in optimal condition, regular maintenance is important. This includes:
By understanding the benefits, preparing the substrate properly, and following the correct installation and maintenance procedures, polyurethane resin flooring can create a modern and stylish look in any space while offering durability and longevity.
Understanding the Benefits of Polyurethane Resin Flooring
When it comes to modern flooring, polyurethane resin takes the crown. Let’s dive into the awesome benefits it provides. From its exceptional durability and longevity to its impressive chemical and stain resistance, polyurethane resin flooring has got you covered. Not to mention, its easy maintenance and the wide range of design options it offers. Get ready to discover the perks of this versatile flooring solution.
Translated text:
Understanding the Benefits of Polyurethane Resin Flooring
When it comes to modern flooring, polyurethane resin takes the crown. Let’s dive into the awesome benefits it provides. From its exceptional durability and longevity to its impressive chemical and stain resistance, polyurethane resin flooring has got you covered. Not to mention, its easy maintenance and the wide range of design options it offers. Get ready to discover the perks of this versatile flooring solution.
Polyurethane resin flooring is renowned for its exceptional durability and longevity, making it a popular choice for areas with high foot traffic. The following are the key factors contributing to its long-lasting performance:
Polyurethane resin flooring offers excellent chemical and stain resistance, making it a popular choice for industrial and commercial spaces.
| Durability and Longevity | Chemical and Stain Resistance | Easy Maintenance | Versatile Design Options |
| Provides a tough and long-lasting surface. | Resistant to chemicals, oils, and stains. | Simple to clean and requires minimal maintenance. | Available in various colours, patterns, and finishes. |
With its exceptional chemical and stain resistance, polyurethane resin flooring ensures a durable and pristine surface, even in high traffic or demanding environments.
Maintaining polyurethane resin flooring is straightforward and simple, allowing you to enjoy its benefits for an extended period. Follow these easy maintenance steps:
Pro-tip: Avoid using abrasive cleaning tools or harsh chemicals as they can damage the resin flooring. Stick to gentle cleaning methods and maintain a regular maintenance schedule for optimal results.
Polyurethane resin flooring provides a wide range of design options to cater to different aesthetic preferences and functional requirements.
Fun Fact: Polyurethane resin flooring is commonly utilised in high-end retail stores, museums, and luxury homes due to its versatility and ability to create unique and eye-catching design elements.
Before starting to create a modern look with polyurethane resin flooring, it is important to first understand the importance of preparing the substrate. This section will discuss the necessary steps for achieving a flawless outcome, including surface cleaning and repair, moisture and humidity testing, and priming the substrate. By implementing these essential techniques, you will be able to create stunning polyurethane resin flooring that transforms your space.
Proper surface cleaning and repair are essential steps in preparing the substrate for the installation of polyurethane resin flooring.
By following these steps, you can ensure that the surface is clean, repaired, and ready for the application of polyurethane resin flooring, resulting in a durable and long-lasting finish.
Moisture and humidity testing is an essential step in preparing the substrate for polyurethane resin flooring. Here are the steps to follow when performing this testing:
Thorough moisture and humidity testing will ensure the substrate is in the right condition for a successful polyurethane resin flooring installation.
Priming the substrate is an essential step in the installation of polyurethane resin flooring. It prepares the surface for proper adhesion and ensures a durable and long-lasting finish. Here are the key steps involved in priming the substrate:
By following these steps, you can ensure proper adhesion and improve the performance and longevity of your polyurethane resin flooring.
Installing Polyurethane Resin Flooring is a straightforward process that can help you achieve a stunning modern look for your floors. We will guide you through each step, from mixing and applying the resin to adding decorative elements, smoothing and leveling the surface, and understanding curing and drying times. By following our instructions, you can transform your space with a seamless and stylish finish that will leave a lasting impression.
When it comes to mixing and applying resin for polyurethane resin flooring, there are a few important steps to follow:
Prepare the area: Ensure the floor is clean, dry, and free from any debris or contaminants that could affect the adhesion of the resin.
Mix the resin: Follow the manufacturer’s instructions for mixing the resin components. Use the appropriate ratio of resin to hardener and mix thoroughly to ensure a consistent blend.
Apply the resin: Use a roller or brush to evenly spread the resin onto the floor surface. Work in small sections, being careful not to apply too much resin at once, as it can lead to uneven coverage or pooling.
Spread and level: Use a notched trowel or squeegee to spread the resin evenly across the entire area. Work quickly to prevent the resin from drying before it is fully spread and levelled.
Allow curing: Leave the resin to cure according to the manufacturer’s instructions. This can take several hours or even days, depending on the specific product and environmental conditions.
Inspect and touch up: Once the resin has cured, inspect the surface for any imperfections or uneven areas. Use sandpaper or a grinder to smooth and level any rough spots, and apply additional resin as needed to achieve the desired finish.
By following these steps, you can ensure a successful mixing and application process for polyurethane resin flooring.
Adding decorative elements to polyurethane resin flooring can enhance its visual appeal and create a unique design. Here are some ways to incorporate decorative elements:
To achieve a smooth and level surface when installing polyurethane resin flooring, follow these steps:
Prepare the substrate by removing any debris or loose material.
Fill in any cracks or holes using a suitable repair compound.
Sand down any uneven areas to create a level surface.
Apply a self-levelling primer to ensure proper adhesion of the resin.
Pour the resin mixture onto the prepared surface.
Spread the resin using a notched trowel to achieve an even thickness.
Use a spiked roller to eliminate any air bubbles and ensure a smooth finish.
Allow the resin to cure according to the manufacturer’s instructions.
By following these steps, you can ensure that your polyurethane resin flooring is smooth and level. Remember to always refer to the manufacturer’s guidelines for specific instructions and recommendations.
Curing and drying time is a crucial aspect of installing polyurethane resin flooring. It is important to allow sufficient time for the resin to cure and dry properly in order to achieve a durable and long-lasting finish. Here are the steps involved in the curing and drying process:
By following these steps and allowing the necessary curing and drying time, you can ensure the successful installation of polyurethane resin flooring.
To ensure the longevity and attractiveness of your polyurethane resin flooring, it is important to perform regular maintenance and care. This section will discuss essential techniques for maintaining and extending the lifespan of your flooring. These techniques include regular cleaning, surface repair, and the application of protective coatings. Each sub-section provides valuable tips and tricks to guarantee that your flooring remains a durable and visually appealing option for your space.
Regular cleaning and maintenance are essential for the upkeep and longevity of polyurethane resin flooring. Follow these steps to keep your flooring in excellent condition:
To repair and restore a polyurethane resin flooring surface, these steps should be followed:
By following these steps, the surface of your polyurethane resin flooring can be effectively repaired and restored, ensuring its longevity and maintaining its aesthetic appeal.
When it comes to applying protective coatings for polyurethane resin flooring, there are a few essential steps to follow:
Yes, polyurethane resin flooring is known for its exceptional durability and can withstand heavy foot traffic. Its resistance to impact and abrasion makes it a great choice for both residential and commercial spaces.
Yes, polyurethane resin flooring is resistant to water damage, making it suitable for areas prone to spills and moisture such as kitchens and bathrooms. Its non-porous surface prevents water from seeping in and causing damage.
Polyurethane resin flooring offers a vast palette of colours and finishes to choose from, allowing for customization according to the desired design aesthetic. Its seamless and smooth surface without grout lines or seams creates a clean and modern look, blending aesthetics and functionality seamlessly.
While the initial cost of polyurethane resin flooring may be higher compared to other flooring options, its durability and longevity reduce the need for frequent replacements. Additionally, its low maintenance requirements save on cleaning and repair costs in the long run, making it a cost-effective choice.
Yes, polyurethane resin flooring is easy to clean and maintain. Regular sweeping and mopping with pH-neutral cleaners is recommended. Its seamless and non-porous surface prevents the growth of bacteria and mold, offering a hygienic and easy-to-clean flooring solution.
Yes, polyurethane resin flooring is compatible with underfloor heating systems. Its heat-resistant properties make it suitable for use in conjunction with such systems, providing a comfortable and cozy environment.
We Aim To Reply To All Enquiries With-in 24-Hours