20+ Years Experience
Specialist Factory Flooring
Enquire Today For A Free No Obligation Quote
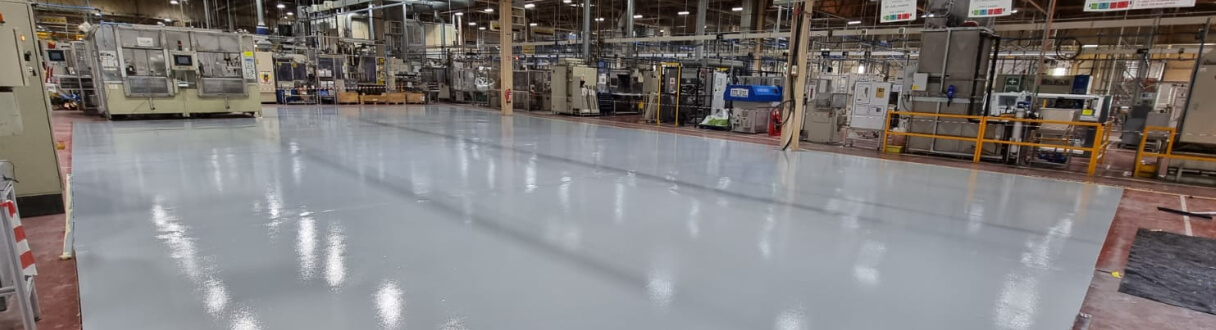
Surface preparation plays a crucial role in the successful installation of resin flooring. It is essential to ensure that the surface is properly inspected, cleaned, repaired, and primed before applying the resin coating. This article will guide you on how to prepare your surface effectively for resin flooring installation.
Why is Surface Preparation Important for Resin Flooring Installation?
Proper surface preparation is vital to achieve a durable, long-lasting, and visually appealing resin flooring. It ensures that the resin adheres securely to the substrate, minimizes the risk of delamination, and prevents issues such as cracks, bubbles, or uneven areas. By preparing the surface correctly, you create a solid foundation for the resin flooring system, enhancing its performance and longevity.
Inspecting the Surface
Before starting the surface preparation process, a thorough inspection is necessary. This involves identifying cracks, holes, and uneven areas that need to be addressed. By assessing the moisture levels, you can determine if any dampness issues exist, which may affect the adhesion and performance of the resin flooring.
Cleaning the Surface
Cleaning the surface is an essential step to remove dust, dirt, debris, grease, oil, and chemical stains. A clean surface ensures proper adhesion and prevents any contaminants from interfering with the resin flooring installation.
Repairing the Surface
Once the surface is clean and inspected, any cracks, holes, or gaps should be filled to create a smooth and even substrate. This can be done by filling the damaged areas with suitable repair materials and ensuring they are thoroughly cured before proceeding.
Preparing Concrete Surfaces
Concrete surfaces may require additional preparation methods such as shot blasting or mechanical grinding to create a rough and porous profile. This allows the resin to bond tightly to the concrete, improving its adhesion and performance. Acid etching is another option to achieve the desired surface texture.
Priming the Surface
Priming the surface is a crucial step in the surface preparation process. It involves choosing the right primer that is compatible with the resin flooring system and applying it evenly onto the prepared surface. The primer acts as a bond enhancer, improving the adhesion of the resin coating to the substrate.
By following these essential steps and properly preparing your surface for resin flooring installation, you can ensure a successful and long-lasting flooring solution.
Surface preparation is crucial for successful resin flooring installation. It ensures that the resin flooring has strong adhesion, durability, and longevity. Let’s explore the importance of surface preparation:
To highlight the significance of surface preparation, let’s look at a historical example. In 1965, a well-known historical building in London underwent a major renovation. The architects prioritised surface preparation for the resin flooring installation in order to preserve the building’s heritage. Their meticulous preparation ensured a flawless finish, contributing to the building’s legacy and longevity.
Inspecting the Surface
Before you begin the process of resin flooring installation, it is essential to inspect the surface. This step involves a careful examination of the area to identify any cracks, holes, or uneven areas that may affect the installation process. It is crucial to assess the moisture levels to ensure the longevity and durability of your resin flooring. So, let us roll up our sleeves and commence this vital part of the process!
Identifying cracks, holes, and uneven areas is essential in preparing the surface for resin flooring installation. This ensures a smooth and stable base for the flooring. Here are the steps to follow:
By identifying and addressing these issues, you can ensure that the surface is properly prepared and ready for resin flooring installation.
Assessing moisture levels is a crucial step in preparing the surface for resin flooring installation. Here is a step-by-step guide on how to assess moisture levels:
True story: A flooring contractor once skipped the moisture assessment step and installed resin flooring in a basement. Within a few months, the floor started to bubble and peel due to high moisture levels. This costly mistake could have been avoided by properly assessing the moisture levels beforehand.
Cleaning the Surface
Get ready to transform your surface for resin flooring installation! This section will explore the crucial process of cleaning the surface prior to applying the resin. We will discuss removing dust, dirt, and debris, as well as tackling grease, oil, and chemical stains. A clean surface will not only enhance the appearance of your resin flooring but also extend its lifespan. Let’s begin cleaning!
Removing dust, dirt, and debris is an essential step in preparing the surface for resin flooring installation. Here are the necessary steps to effectively clean the surface:
Thoroughly sweep the area using a broom to remove loose debris.
Vacuum the surface to eliminate fine particles and dust.
Use a damp mop or cloth to wipe away any remaining dirt and grime.
If necessary, apply a cleaning solution specifically designed for the type of surface being treated, following the manufacturer’s instructions.
Rinse the surface with clean water to remove any residue from the cleaning solution.
Allow the surface to dry completely before proceeding with the next steps of resin flooring installation.
By diligently removing dust, dirt, and debris, you ensure a clean and sound foundation for the resin flooring, promoting proper adhesion and a smooth, long-lasting finish.
Pro-tip: To prevent future stains, consider applying a protective coating or sealant to the surface after cleaning.
Repairing the Surface
When preparing your surface for resin flooring installation, the most important step is to effectively repair the surface. In this section, we will explore the process of surface repair and discover the secrets to filling cracks, holes, and gaps flawlessly. We will uncover the techniques required to achieve a smooth and level surface, providing the ideal foundation for your resin flooring. Let’s delve into the topic and learn how to restore your surface to its optimal condition, in preparation for the transformative power of resin flooring.
Filling cracks, holes, and gaps is a crucial step in preparing the surface for resin flooring installation. It is important to ensure a smooth and even base to enhance the longevity and performance of the flooring. Here are some key considerations for filling these imperfections:
True story: During a renovation project, a contractor discovered several cracks and holes in the concrete flooring. They diligently filled the imperfections with a high-quality epoxy filler, ensuring a seamless and durable surface for the resin flooring installation. The attention to detail in filling the cracks, holes, and gaps paid off, as the finished flooring looked flawless and stood the test of time.
Smoothing uneven areas is a crucial step in preparing the surface for resin flooring installation. To achieve a smooth and level surface, follow these steps:
Preparing Concrete SurfacesGetting your concrete surface ready for resin flooring installation is an important step to achieve a long-lasting and seamless finish. Here, we will discuss two effective methods: shot blasting or mechanical grinding and acid etching. These techniques are essential to ensure proper adhesion and a smooth surface for your resin flooring. Let’s explore the best ways to prepare your concrete surface for a successful resin flooring installation.
Shot blasting and mechanical grinding are two common methods used to prepare concrete surfaces for resin flooring installation. Here is a list of key points to consider for each method:
Shot Blasting:
| 1. Abrasive action: | Shot blasting uses steel shot propelled at high speeds to remove contaminants and create a rough texture on the concrete surface. |
| 2. Surface profile: | Shot blasting ensures a consistent surface profile, enhancing the adhesion of the resin flooring. |
| 3. Dust control: | Specialised equipment includes dust collection systems, minimising airborne particles during the process. |
| 4. Suitable for large areas: | Shot blasting is efficient for preparing expansive surfaces, such as warehouses or industrial facilities. |
Mechanical Grinding:
| 1. Mechanical action: | Grinding machines equipped with diamond grinding discs are used to remove imperfections and smooth the concrete surface. |
| 2. Surface levelling: | Grinding can even out uneven areas, creating a flat and uniform substrate for the resin flooring. |
| 3. Variable aggressiveness: | Different levels of grinding can be achieved, depending on the desired surface preparation requirements. |
| 4. Suitable for smaller spaces: | Mechanical grinding is ideal for tighter spaces, such as residential garages or commercial kitchens. |
During a recent renovation project, a contractor used shot blasting to prepare the concrete floor of a large warehouse for a new resin flooring. By using this method, they were able to efficiently remove dirt, old coatings, and achieve the required surface profile. The resulting resin flooring adhered perfectly to the prepared surface, providing a durable and attractive finish for the warehouse. The shot blasting process significantly reduced downtime compared to alternative methods, allowing the business to resume operations quickly.
Acid etching is a crucial step in preparing concrete surfaces for the installation of resin flooring. The acid etching process involves several steps, which are outlined below:
Fun Fact: Acid etching creates a rough texture on the concrete surface, providing better adhesion for the resin flooring and improving its durability.
Priming the Surface
Before applying resin flooring, it is essential to prime the surface correctly. This section delves into the key aspects of priming to achieve a seamless and durable resin installation. Learn about the importance of selecting the appropriate primer and discover the best techniques for its application. Prepare to transform your surface into a solid foundation that enhances the longevity and performance of your resin flooring. Let’s explore the world of priming and uncover the secrets to a successful resin installation.
Choosing the appropriate primer is essential when preparing the surface for resin flooring installation. The following steps should be followed to select the right primer:
Assess the substrate: Evaluate the type and condition of the surface to identify any specific requirements.
Research primer types: Familiarise yourself with the various types of primers available, such as epoxy or acrylic, and their compatibility with the substrate.
Consider environmental factors: Take into account the temperature, humidity, and chemical exposure that the primer will need to endure.
Consult with a professional: Seek advice from flooring experts or manufacturers to ensure you choose a primer suitable for your specific project.
Consider specific needs: Depending on the substrate and topcoat, select a primer that provides the necessary adhesion, moisture resistance, or stain-blocking properties.
Application method: Determine whether a roller, brush, or spray application is most suitable for the primer and ensure you have the necessary equipment.
Follow manufacturer’s instructions: Carefully read and adhere to the manufacturer’s guidelines for mixing ratios, application techniques, and curing times.
Applying the primer is an essential step in preparing the surface for resin flooring installation. Follow these steps for a successful application:
By applying the primer carefully, you create a strong bond between the substrate and the resin, ensuring a durable and long-lasting resin flooring.
Subfloor preparation is crucial for a successful resin flooring installation. It ensures that the surface is clean, dry, and smooth, which is essential for proper adhesion and longevity of the resin coating.
The concrete subfloor should have a compressive strength of over 30N/sqmm to withstand heavy use and provide a stable foundation for the resin flooring.
It’s important to use the correct primer for each surface. The appropriate primer should be chosen based on the type of subfloor, such as concrete, anhydrite screed, or sand and cement screed, to ensure proper bonding and a durable final result.
Absolutely! State-of-the-art machinery, like industrial-grade grinders with diamond plates, can be used to smoothen the concrete surface and achieve the desired level of preparation for resin flooring installation.
Yes, there are eco-drainage channels and soakaways that can be installed as alternatives to replacing existing drainage systems. These options help manage surface water runoff in an environmentally conscious way.
To remove previous installations, it is recommended to tape plastic sheeting along the walls to protect them from the resin. This will prevent any damage or staining. Additionally, any solid waste or stains should be scrubbed away before starting the installation process.
We Aim To Reply To All Enquiries With-in 24-Hours